On Jurying

image-asset.jpg

A message from Helen Iaea:

I wanted to comment a bit about the jury process from the point of having been at a lot of jurying. First, remember, it is the opinion of one, or more, persons. They are using their knowledge and training and experience to pull the strongest paintings offered into a cohesive show. That said, other things come into play. We enter our best work and usually expect good results and are disappointed if we don’t get in or don’t get an award. The thing most artists don’t think about is "what else was entered?.” If half of the show entries are white florals, only the best compositions, most unusual and unique ones will be selected - paintings that don’t look so much like copies of a photo but the artists response to the subject. The juror is looking for a well rounded show and looks for the strongest paintings in each category. If only two portraits are entered, they might choose one not because it’s a great painting but so there is variety offered to the audience. It might not be the best portrait in the world but it was the best offered to the juror and definitely good enough to be shown. So, when you don’t get in, it isn’t always that the painting is bad, maybe it just had a lot of competition in the same area. Most of us don’t get to see all of the entries. Entered in another show, that same painting could get in and even win an award! I’ve seen it happen!

Get Out There and Play

by PAH member Jack Kinkelaar

Aloha. Is anyone getting bored with pastel painting yet? Maybe it is time to go back to finger painting.

Finger paints are wet, pastels are dry. In both media you get your hands dirty. For me as a kid, finger paints led to abstraction in the sense that it was hard to be specific within that liquid medium. I liked mixing colors but I usually ended up with a muddy mess. Pastel being solid takes me toward the linear which allows me to turn abstraction into reality. I might try finger paints again. I wonder how they would work on sanded paper? I know that watercolors look marvelous on sanded paper.

I spent this morning plein air painting with Thinam Carroll over at Ke’ei in Kona. It sure is nice to go out to enjoy these special places. Entering our juried show has nothing to do with anything compared to being out painting. Get out there and play.

Plein air painting with Thinam Carrol at Ke’ei in Kona.

Plein air painting with Thinam Carrol at Ke’ei in Kona.

Getting Back to My Roots

By PAH Member Jack Kinkelaar

I decided to go back to my roots in pastel. I started painting on Canson colored paper again. Just to do it. It was kind of fun to work on that surface. It is relatively inexpensive and so it allows for a little more playfulness in my painting. I also tried Sennelier L’esprit de pastel paper. Costs a little more but it has crystal imbedded in it and so even though it seems like a regular drawing paper, it has a nice ability to hold pastel. It cost twice as much as the Canson but is still half the cost of UArt sanded paper. The Sennelier paper is thin and easily warps. I have not tried to mount it. It comes in a spiral bound pac with sheets of glassine between the pastel sheets. It could be used as a pastel sketch book.

For those of you who are not afraid of using Facebook, you can join the Pastel Society of America FB Group. It is a bit over the top (in the sense of who needs an hourly onslaught of paintings, advice and queries) but you will get to see what others the profession are up to. I found this one post worth the read and so I will post the url. It is stuff you probably already know but a reminder isn’t such an awful thing as we age. Go to jowtopastel.com and once you open the site scroll down until you come to this blog—Improve Your Painting-20 Master Pastellists tell you how. This might be helpful.

At some point you just have to let all this data go and get out and paint. Experiment, play, try something outside your comfort zone, do multiple versions of something you are good at, share your successes and failures. Thank you for being the artist that you are. Your work gives happiness to others. Is there a better legacy for your passage through the galaxy?

Painting done on Sennelier L’esprit du Pastel paper. Coastal pools in front of the Kona Inn, 9x12 by Jack Kinkelaar

Painting done on Sennelier L’esprit du Pastel paper. Coastal pools in front of the Kona Inn, 9x12 by Jack Kinkelaar

Pools in front of the Kona Inn, 9x12 on 500 Uart sanded paper by Jack Kinkelaar

Pools in front of the Kona Inn, 9x12 on 500 Uart sanded paper by Jack Kinkelaar

Tips on Supplies From Liz Haywood-Sullivan

Our 2018 juror and workshop leader, Liz Haywood-Sullivan has suggestions for supplies. It is worth the read for everyone, not just for those taking her workshop.

PASTELS

Pastels are expensive and I do not expect you to go out and purchase large quantities of pastels for my workshops. The following are my recommendations (not requirements) for the best workshop experience.

This box has approximately 250 pastels, arranged by color and then value. Softer pastels - Art Spectrum, Sennelier, Ludwig, Schmeinke, Townsend, Great American, Blue Earth, Mt. Vision. Medium pastels - Unison. Harder pastels - Girault, Rembrandt (I …

This box has approximately 250 pastels, arranged by color and then value. Softer pastels - Art Spectrum, Sennelier, Ludwig, Schmeinke, Townsend, Great American, Blue Earth, Mt. Vision. Medium pastels - Unison. Harder pastels - Girault, Rembrandt (I do not recommend Nupastels other than for underdrawing, they are too hard and not lightfast. I also do not recommend inexpensive pastels due to concerns of content quality.)

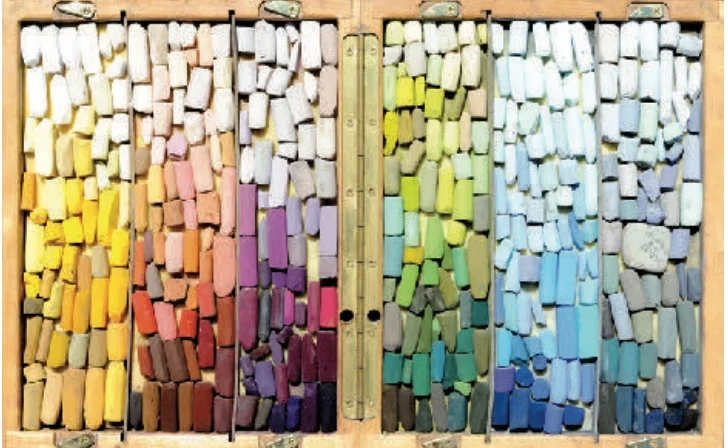
  • Bring your pastels of choice - a minimum of 100 different colors. This is important.

  • Please remove wrappings so you can see colors and easily use your pastels. This is important.

  • If you break them in half you can double the colors you bring. Most pastels will break cleanly.

  • If possible bring a range of soft, medium and harder pastels.

  • I recommend one artist’s box to hold them all versus bringing them in lots of different containers. This makes it easier to setup. This is essential if you need to travel by air where you are required to send hand carried pastels through a security checkpoint.

  • Take a good look at your range of pastels: If you do not have a good selection of NEUTRALS then I suggest you purchase one of the following: Unison Grays 1-18 or Maggie Price Essential Grays by Terry Ludwig. If you do not have any harder pastels (which are good for drawing and details) then I HIGHLY recommend one of the following: Girault 25 piece Grays Set or Girault 25 piece Landscape Set.

PLEASE NOTE: Depending upon the workshop topic you might need to adjust the pastels you bring. For instance, a sky and clouds workshop requires a good selection of blues and grays. I never alter the pastels in my box. Depending on where I am painting I bring a smaller extra box of the additional colors I think I might need.

PAPER

Bring paper for doing two paintings a day. You may only get to one, but once at a workshop you may not be able to purchase additional materials.

I recommend UART, Art Spectrum, Canson Mi Tientes Touch, or Pastelmat,. You can also make your own sanded surface. (Note: Pastel Premier and Wallis do not work well with alcohol underpainting, only with water - which takes longer to dry.)

For Studio-based Workshops - Paper size should be approximately 12 x 16.

For Plein Air Workshops - Paper should be 12 x 16 or smaller. To make it easier to handle your painting you might consider dry-mounting your paper to a rigid surface such as gatorboard, or buying paper premounted to a rigid backing.

ADDITIONAL SUPPLIES

  • Portable Easel

  • Drawing Board - big enough to hold a half sheet of paper. Alternatively, you can mount your paper on a rigid surface such as gatorboard which eliminates the need for a drawing board.

  • Tape - no colored painters tape. Black, beige or white only.

  • Sketchbook and Drawing utensils - this is important. (I use a black sharpie marker for sketching and Tombow markers in 3 values of grey for value studies.)

  • Vine Charcoal (medium or soft).

  • Glassine - this is to protect your paintings during transport when finished.

  • Towel - to place under your easel, softens the blow of dropped pastels & keeps floors clean.

  • Alcohol for underpainting - bring isopropyl rubbing alcohol (not ethyl alcohol) which can be found in first aid section of pharmacies, grocery stores. Alcohol and other solvents cannot be brought on planes. (Note: water works just fine at plein air workshops in hot, dry areas.)

  • Sealed container to hold alcohol

  • Baby wipes - for quick cleanup

  • Brushes - bring synthetic brushes, no natural bristle - flats in 1/2”, 3/4”, 1”sizes recommended • Viewfinder - required for plein air workshops


REFERENCE IMAGES

Students should bring good reference images relevant to the topic of the workshop. You can work from an iPad, or laptop as well as photoprints. Please do not use plain copy paper prints from your home printer as the color is rarely accurate. You can make glossy digital prints at local drugstore, Walmart, etc, or buy photo paper to use in your home printer.

Images should focus on the workshop topic. And please use your own images. Your paintings will only be as good as your reference images.

NOTES FOR PLEIN AIR WORKSHOPS

  • if you use an umbrella buy one in a neutral tone. Colored umbrellas affect your color choices.

  • When painting outdoors wear neutral colored clothing and aprons.

  • Reflected light off colored clothing bounces onto your painting and will affect your color choices.

  • An empty slide holder works well as an easy, inexpensive viewfinder.

  • Bring additional plein air supplies: hat, sunscreen, waterbottle, bug spray, comfortable shoes.

FINAL NOTE

Finding the materials that work best for you is a process of experimentation, is individual to each artist, and takes time. Taking a workshop is the perfect time to try something new. This materials list is a guideline.

If you are more experienced then use this materials list as a reference and feel free to work with your favorite materials.

If you have any questions please don’t hesitate to contact me: liz@haywood-sullivan.com

How to Adhere Sanded Pastel Paper to Gator Board

By PAH Member Jack Kinkelaar

Aloha everyone, here is a video I made on how to adhere sanded pastel paper to gator board that does not have adhesive on it. I will be using spray contact cement for the adhesive. If any of you dinosaurs are still smoking, please refrain when using the spray glue. I also will be posting a video on how to use liquid glue to adhere paper to gator board.

I order my gator board on eBay. Just check the listings for gator board with adhesive back. The company is Artgrafix. They are less than nice about shipping to Hawaii. I have to have my board shipped to a friend on the mainland who reships it to me.

Pastel Allergies

By PAH Member Jack Kinkelaar

Aloha everyone. I am going to write about pastel allergies today. I am doing so because a second person emailed me about pastel dust issues. The first person is on Oahu and I think we may have figured out a solution for her. So if this information helps, use it. If not, save it for when someone needs it.

I’m writing this as a Registered Nurse. Not a diagnosis, just some information.

When you paint with pastels, you get dust on your hands and in your air space. Some people react to pastel dust. Think about it, it is made up of ground pigments, some are natural and some are totally chemical. But it is still dust that can enter your airway and get into your bronchioles and lungs. In the past you could see in Pastel Journal vacuum systems that connect to your easel. I’m not seeing them anymore so either they didn’t work, were too expensive or just not marketable. Those vacuum systems would still have to be emptied and have filters cleaned. So if you are allergic to pastel dust who is going to maintain your system?

In the world of nursing we have patients with airborne diseases such as tuberculosis. When we take care of these patients we need to wear masks that actually seal onto our faces so that microscopic airborne diseases do not get ingested into our lungs. Not any mask will do. The ones that are made to keep out all particulate are called N95 masks. You can order these on Amazon.

Because of the volcanic gasses and ash that we are experiencing on Hawaii Island, N95 masks are now available at Drug stores and Hardware stores here. These masks are made to keep you safe from airborne pathogens. If you are allergic to pastel dust, I recommend that you try using these masks.

Unfortunately, these masks are hot because they seal around your nose and mouth and you are rebreathing some of your air. From a nursing perspective having a patient in airborne isolation was a pain because of the masks which are uncomfortable and hot. But they work! Every year all staff that take care of patients had to have a fit test to make sure that they were using the mask properly. You put on the mask and go under a hood and someone spays aspartame sweetener into a hole in the hood. If you taste any sweetness, you fail and have to try a different size mask or learn how to get your mask to really fit tight on you face.

You as a pastel artist do not get to do a fit test on these N95 masks so you still might have a reaction to pastel dust if your are allergic to it. At this point I’m not allergic and I hope the majority of you are not either.

N95 masks are good for up to 8 hours. Surgical masks do NOT protect you from particulate because they are not sealed. Plus the standard surgical mask is only good until it gets moist from breathing which is about twenty minutes. The masks need to say N95. You can go to YouTube and watch a video on how to wear and remove N95 mask. Also I’ve noticed that someone is recommending N95 masks if you live near one of the major fires that are happening on the mainland. http://youtu.be/bo-PEzHE7iw (this is a link that shows you how to put on and fit a N95 mask).

Pasted_Image_8_1_18__6_18_AM.jpg

This is a surgical mask. This is not the kind of mask that you need if you are allergic to pastel dust. It might work well in an airport security line or for robbing a bank, but not very well on the plane (if you are germophobic) or when painting with pastels.

Pasted_Image_8_1_18__6_19_AM.jpg

This is an example of a N95 mask. Notice the wire band up where the mask sits on your nose. You form fit this wire to nestle on the bridge of your nose.

Pasted_Image_8_1_18__6_19_AM-2.jpg

This is the hood that they test you with using the aspartame spay. I’m not sure why the person under the hood is not wearing a mask. So much for stock photos.


Dealing With Mold Bloom on Unfinished Pastels

By PAH Member Jack Kinkelaar

Years ago I had a problem with mold bloom growing on my finished unframed pastels. I was using Richard McKinley’s method of glueing my pastel paper to a mat board. Many of my pastels had various amounts of mold bloom back then. I had those pieces mounted on the walls with push pins (in other words open to air). I was using archival glue and all the pH balanced products.

Candace Fenander sent me an article (which I posted). Ultimately the article recommended a light spray on the finished pastel paintings of clear athlete’s foot medication as it is an anti-fungal. Believe it or not, that worked. But what really worked was not using regular mat board and switching to gator board. I also stopped glueing my sanded pastel paper to the gator board. I now order (Amazon) my gator board with one side having an adhesive surface. This means less air pockets or glue bumps when I adhere a sheet of sanded paper to the gator board.

I also have an air-conditioner in my studio. I am not using the air conditioner as its so cold, but when it is hot it sure makes the studio more pleasant to work in. I think the climate control of the air conditioner helps with the mold blooms.

I hate to be promoting various businesses but Walmart had the most options on the spray athlete’s foot medication. You have to make sure you buy the clear spray. The white powder spray version will totally mess up your paintings.

I paint with artists in my Friday plein air group who have had problems with mold blooms on acrylic and oil paintings here in Hawaii. So it is not just a pastel thing.

Why Breaking Your Pastels in Half is a Good Idea

By PAH Member Jack Kinkelaar

I thought I would get back to my discussion of plein air set ups. Below is a picture of Mark Norseth’s setup that he used in our last pastel workshop. I think this is some version of a French easel. Unfortunately these wooden monoliths weigh in at 14 pounds empty. So add the weight of your pastels and other supplies and you might need a personal assistant to help carry your stuff into the field.

Mark's easel

Mark's easel

I added a picture of Christine Ahia’s set up. Beautiful as this is, I’m posting it for a reason. You may get the idea about the difference between Christine’s set up and Helen’s set up (I didn’t post it to show off shoe styles). Look how little Helen’s pastels are. She has broken them in half and so she maximizes the amount of different colors that she can have in her pastel box. Christine’s are whole sticks and so she has less choice when out in the field. So if you want more color choices, be bold and break your pastels in half (or smaller). I think I’ve done enough of this for now.

Christine's easel

Christine's easel

Helen's pastel box

Helen's pastel box